Hands-on tutorial instructions
Please refer to the preliminary setup instructions to either use the tutorial Docker image, or setup your machine to use ESP.
You will be able to execute all the steps of the tutorial that do not require a commercial CAD tool or an FPGA board. The steps that require commercial CAD tools or an FPGA board are marked in red, and will be offered in the form of a demo.
Remember to setup the required environment variables in every new terminal shell that you open. Since you will not use any commercial CAD tool, and you will only compile software for the Ariane RISC-V processor core, the required environment setup is the following:
# Xilinx Vivado environment
  # XILINX_VIVADO needs to be defined, but you will not use Vivado
  export XILINX_VIVADO=.

# RISC-V toolchain environment
  # if you are using the Docker <riscv_path> = /home/espuser/riscv
  # if you are not using the Docker, use your own installation path for the RISC-V toolchain
  export RISCV=<riscv_path>
  export PATH=$PATH:<riscv_path>/bin
1) How to: design and integrate SystemC accelerators (Stratus HLS)
Generate the accelerator skeleton
Move into the ESP repository (/home/espuser/esp if you are using the
Docker image) and launch the accelerator generation tool.
cd /path/to/esp
./tools/accgen/accgen.sh
Answer to each question of the interactive script shows
below. Pressing enter without inserting any text will select the
default option shown within square brackets (e.g. see the Enter ESP
path line below).
=== Initializing ESP accelerator template ===

  * Enter accelerator name [dummy]: sub
  * Select design flow (Stratus HLS, Vivado HLS, hls4ml) [S]: S
  * Enter ESP path [/path/to/esp]:
  * Enter unique accelerator id as three hex digits [04A]: 061
  * Enter accelerator registers
    - register 0 name [size]: sub_length
    - register 0 default value [1]: 8
    - register 0 max value [8]: 1024
    - register 1 name []: sub_batch
    - register 1 default value [1]: 2
    - register 1 max value [2]: 400
    - register 2 name []:
  * Configure PLM size and create skeleton for load and store:
    - Enter data bit-width (8, 16, 32, 64) [32]: 16
    - Enter input data size in terms of configuration registers (e.g. 2 * sub_length}) [sub_length]: sub_length
      data_in_size_max = 1024
    - Enter output data size in terms of configuration registers (e.g. 2 * sub_length) [sub_length]: sub_length
      data_out_size_max = 1024
    - Enter an integer chunking factor (use 1 if you want PLM size equal to data size) [1]:
      Input PLM has 1024 16-bits words
      Output PLM has 1024 16-bits words
    - Enter number of input data to be processed in batch (can be function of configuration registers) [1]: sub_batch
      batching_factor_max = 400
    - Is output stored in place? [N]: Y

=== Generated accelerator skeleton for sub ===
Implement the computation block of your accelerator
Open accelerators/stratus_hls/sub_stratus/hw/src/sub.cpp and search for // Computing phase implementation.
Replace the identity function
                for (int i = 0; i < in_len; i++) {
                    if (ping)
                        plm_out_ping[i] = plm_in_ping[i];
                    else
                        plm_out_pong[i] = plm_in_pong[i];
                }
with this custom element-wise operation
                for (int i = 0; i < in_len; i++) {
                    if (ping)
                        plm_out_ping[i] = plm_in_ping[i] - 42;
                    else
                        plm_out_pong[i] = plm_in_pong[i] - 42;
                }
Update the unit testbench, and the baremetal and Linux applications
Open accelerators/stratus_hls/sub_stratus/hw/tb/system.cpp and
search for // Input data and golden output.
Replace the default golden output computation
gold[i * out_words_adj + j] = (int16_t) j;
with the custom function
gold[i * out_words_adj + j] = (int16_t) j - 42;
Open accelerators/stratus_hls/sub_stratus/sw/baremetal/sub.c and search for the function init_buf().
Repeat the same edit applied to the unit testbench.
Open accelerators/stratus_hls/sub_stratus/sw/linux/app/sub.c and search for the function init_buffer().
Repeat the same edit applied to the unit testbench.
Run a behavioral SystemC test (requires Stratus HLS)
Go to the SoC design folder for the Xilinx VCU118 FPGA board, and run the following target.
cd socs/xilinx-vcu118-xcvu9p
make sub_stratus-exe
Generate the RTL of your accelerator and of the FFT accelerator
From the same design folder, run Cadence Stratus HLS with the following target (requires Stratus HLS).
cd socs/xilinx-vcu118-xcvu9p
make sub_stratus-hls
make fft_stratus-hls
Since you cannot run Stratus HLS, create manually the accelerator RTL
folders that would be generated by Stratus HLS. This way you will be
able to select the accelerator in the SoC design steps.
cd tech/virtexup/acc
mkdir -p sub_stratus/sub_stratus_basic_dma32
mkdir -p sub_stratus/sub_stratus_basic_dma64
mkdir -p fft_stratus/fft_stratus_basic_fx32_dma32
mkdir -p fft_stratus/fft_stratus_basic_fx32_dma64
mkdir -p fft_stratus/fft_stratus_basic_fx64_dma32
mkdir -p fft_stratus/fft_stratus_basic_fx64_dma64
cp ../../../accelerators/stratus_hls/sub_stratus/hw/sub.xml sub_stratus/sub_stratus.xml
cp ../../../accelerators/stratus_hls/fft_stratus/hw/fft.xml fft_stratus/fft_stratus.xml
Simulate the accelerator RTL with unit testbench (requires Stratus HLS)
Run the following target to test your generated RTL implementations, which include two versions of the accelerator: one for 32-bit DMA channels and one for 64-bit DMA channels.
cd socs/xilinx-vcu118-xcvu9p
make sub_stratus-sim
Check out the generated HLS script
Open accelerators/stratus_hls/sub_stratus/hw/hls/project.tcl.
Compile the software
Move again into the SoC design folder for the Xilinx VCU118 FPGA board, and compile the bare-metal test applications.
cd socs/xilinx-vcu118-xcvu9p
make sub_stratus-baremetal
make fft_stratus-baremetal
Compile Linux, the accelerator device drivers, and Linux test applications.
make linux -j4
2) How to: integrate third-party accelerators (NVDLA)
Generate the NVDLA RTL, compile its kernel space driver, user space driver and runtime application.
cd socs/xilinx-vcu118-xcvu9p
make NV_NVDLA
The NVDLA folder is accelerators/thirdparty/NV_NVDLA.
3) How to: design and test a many-accelerator multi-core SoC
Configure SoC 1
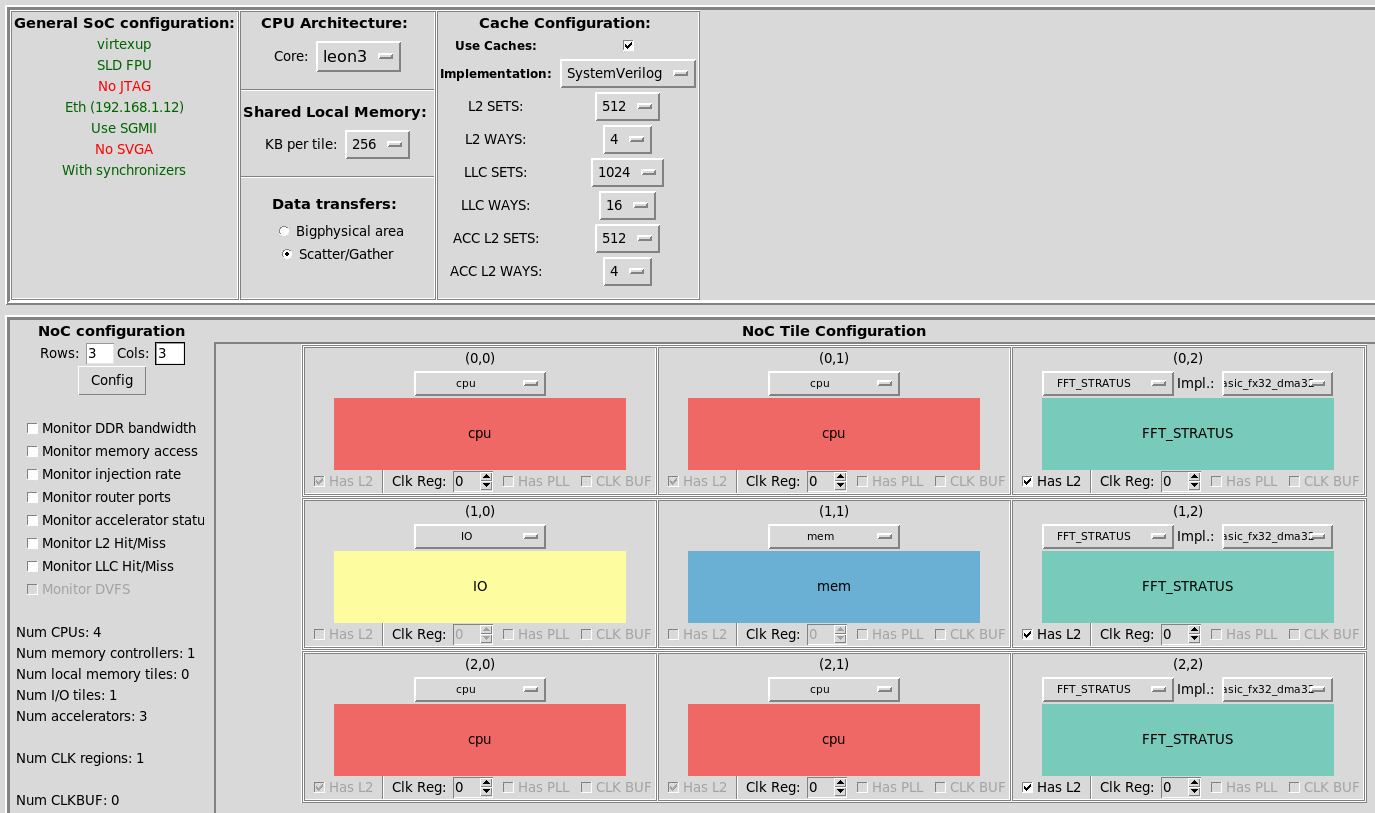
Move to the SoC design folder for the Xilinx VCU118 FPGA board, and launch the SoC configuration GUI.
cd socs/xilinx-vcu118-xcvu9p
make esp-xconfig
Select the following configuration in the GUI. Click Generate SoC config and then close the GUI.

Configure SoC 2
Move to the SoC design folder for the Xilinx VCU128 FPGA board, and launch the SoC configuration GUI.
cd socs/xilinx-vcu128-xcvu37p
make esp-xconfig
Select the following configuration in the GUI. Click Generate SoC config and then close the GUI.
Full-system RTL simulation and FPGA prototyping (requires Modelsim/Incisive/Xcelium, Vivado and an FPGA)
The full-system RTL simulation and the FPGA prototyping parts of the tutorial are offered in the form of a demo.